How to Install Geeni or Merkury Doorbell – Straightforward Guide
This step-by-step guide shows you how to install a Geeni doorbell or Merkury doorbell (They are almost identical), let’s see what tools you need and how to get their doorbell to work correctly. All it will not take much time.
How to Install Geeni or Merkury Doorbell – Hardwired Installation
What You Need:
- A Screwdriver
- A Drill
- A Pencil
Since the Geeni/Merkury doorbell does not have a built-in battery, you should have existing doorbell wiring before installing the doorbell. Make sure your old doorbell is working and the wiring diagram is correct first.
Step One: Wire the chime adapter
- To install your new doorbell, turn off the power breaker for safety.
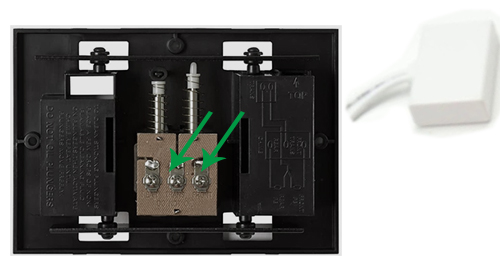
- Remove the cover of your doorbell chime. (See what you should if the cover is hard to take off)
- Loosen the “Front” and “Trans” terminal screws
- Connect the power adapter that comes in the Merkury hardware bag to the “Front” and “Trans” terminals.

And then use the included 3M tape to attach the chime adapter to the side of your doorbell chime and put the cover back on.
Step Two: Mount the bracket
- If you have an existing doorbell button installed, remove the doorbell button first and make sure the wires are not damaged.
- Mark the hole spots with a pencil (The Geeni or Merkury doorbell comes with an angled wall mount that lets you install the doorbell more easily on different types of walls. and you should mark the wall with the angled wall mount if you decide to use it. Otherwise, you should mark the hole spots with the bracket directly)
- Drill the holes and insert the anchors into the holes
- If you don’t need the angled wall mount, just install the bracket and screw it into the anchors.
- For people who need the angled wall mount, you need to fix the angled wall mount with two screws. And install the bracket in the wall mount with two smaller screws.
Step Three: Wire the doorbell
- Connect the two wires for your old doorbell button on the wall to the included wire terminals in the hardware bag.
- And there are two wires with hooks included as well. Use the ends with no hook to connect to the wire terminals on the other side.
- Loosen the screws on the back of the Geeni/Merkury doorbell, connect the hooks to the screws, and tighten the screws. Push the wires to the wall gently.
- Finally, click the Geeni/Merkury doorbell into the bracket and lock in the security screw on the bottom.
- Now, you can turn on the power and your Geeni/Merkury doorbell is successfully installed.
What if I don’t have existing doorbell circuits, can I use the Merkury doorbell?
The answer is yes! I found an article that is mainly about how you can install the Merkury smart WiFi doorbell without existing doorbell wires. And basically, you need to buy a separate doorbell power adapter and use a wireless plug-in doorbell chime to replace those wiring work for doorbells. For more information, check out the article here.


