
Zmodo Doorbell Installation: Best Step-by-Step Guide with Video
Zmodo Greet doorbell camera installation is just a breeze with the most complete guide here.
We will share the step-by-step guide to help you install the Zmodo doorbell camera with/without existing doorbell, as well as the top FAQs.
Jump to:
#1. Install Zmodo Doorbell Camera with Existing Doorbell
#2. Set up Zmodo Doorbell Camera Without Existing Doorbell
#3. Frequently Asked Questions on Zmodo Doorbell Camera Setup
Note: Zmodo doorbell camera is a wired video doorbell which needs to be hardwired to the existing doorbell system or the main power outlet for the power supply.
#1. How to Install Zmodo Doorbell Camera with Existing Wiring: Detailed Steps with a Video
The Zmodo Greet Pro installation includes both hardware and software.
In the first part, we will show you the simple guide to mount the Zmodo doorbell to the stucco wall, or brick. After that, you’ll get the detailed setup guide on how to connect Zmodo doorbell to WiFi.
1. How to Mount Zmodo Doorbell to the Wall
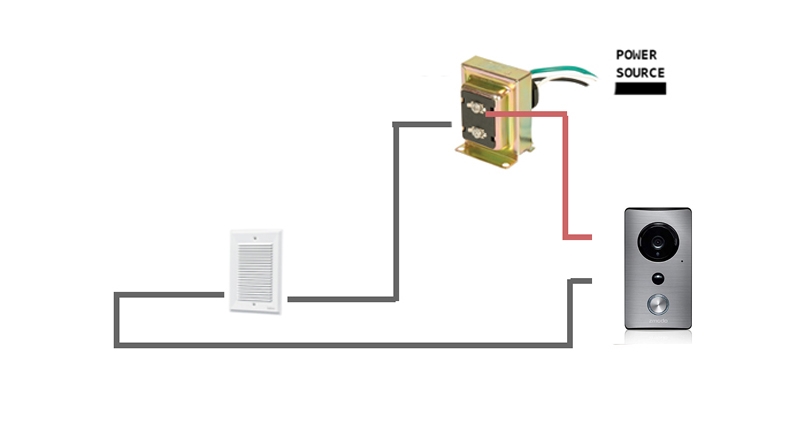
Below is the Zmodo doorbell wiring diagram with the existing doorbell. Make sure your wiring is connected to a mechanical doorbell chime and a transformer with a low-voltage of 10 V AC —36 V AC.
You can also check this post for another video doorbell installation guide.
Step 1. Turn off the breaker to prevent electric shock.
Step 2. Remove the existing doorbell from the wiring. Make sure the 2 wires are exposed from the brick or stucco.
Step 3. Loosen the 2 screws from the bottom of the Zmodo doorbell and slide down to remove the mounting bracket.
Step 4. Put the mounting bracket against the wall where you would love to mount your doorbell. Mark the holes for the screws with a pencil.
Remove the bracket and drill the holes slightly smaller than the wall anchors.
You can use a level to ensure the mounting bracket is aligned.
Step 5. Fasten the bracket to the wall with the screws, and then feed the 2 exposed wires to the terminals on the bracket via tightening the screws.
You can fasten to wires to either terminal but make sure the 2 wires won’t touch each other.
Drilling tip: When you mount the smart video doorbell on brick, concrete or stucco, use the provided screws with anchors. For mounting on wood or vinyl, just drill the surface directly.
Step 6. Slide the Zmodo doorbell camera onto the bracket and tighten it with the 2 screws on the bottom of the doorbell.
Adjust the doorbell till you have the ideal viewing angle of your front door or porch.
Step 7. Turn on the breaker to power on the doorbell camera.
2. How to Connect the Zmodo Doorbell Camera to WiFi or Internet
Zmodo doorbell camera only supports 2.4 GHz WiFi band. Make sure your home router and smartphone all switch to the 2.4 GHz WiFi before setup.
The Zmodo doorbell camera WiFi setup is super easy within 2 mins.
Step 1. Download and launch the Meshare App on your iPhone or Android smartphone.
Step 2. Tap the Add Device icon on the screen to add the video doorbell. Follow the on-screen prompts to continue the configuration.
Step 3. Enter the password of the WiFi that your phone connects to.
The doorbell will start to connect to WiFi when the status LED flashes blue. After the doorbell has connected to the Internet, the status LED will be solid blue.
Step 4. Name your Zmodo smart WiFi doorbell based on your preference, and tap Finish.
Now you can access your doorbell for live streaming via your phone.
When someone presses the doorbell button, you will receive a phone call so that you’ll always know you have a visitor.
Here is a detailed video on Zmodo doorbell installation instructions.
#2. How to Install Zmodo Video Doorbell Without Existing Doorbell
How to set up Zmodo doorbell camera without existing doorbell?
The Zmodo smart WiFi doorbell installation is dead easy with just steps.
Please DO NOT connect the Zmodo doorbell camera to primary power (110/120 V AC & 220/230/240 V AC).
You’ll add an indispensable Zmodo power accessory installation step — add a 20 ohm/10 W resistor between the smart doorbell and one wire from the power source.
Step 1. Turn off the breaker of your home or office.
Step 2. Select an ideal position on your front door or porch.
Step 3. Loosen the screws on the bottom of the doorbell and slide down to remove the mounting bracket from the doorbell.
Step 4. Place the bracket against the wall. Use a level to ensure the bracket is aligned, and mark the holes for the screws with a pencil.
Step 5. Drill the previously marked holes and then mount the bracket to the wall with the screws.
Step 6. Add a 20 ohm/10 W resistor to the cable linking the smart doorbell to the primary power.
Step 7. Fasten the 2 wire to the terminals with the screws.
Step 8. Slide the doorbell camera back to the bracket and mount the doorbell firmly with by fastening the screws on the bottom of the camera.
You can DIY your Zmodo Greet Pro/HD smart WiFi video doorbell installation project with the above steps.
The software setup process is exactly the same that was illustrated in the first part. Simply skip to the software configuration here>>
#3. Frequently Asked Questions on Zmodo Smart Video Doorbell
Check out the quick answers to the hottest questions on Zmodo doorbell camera. If you have any questions or insight, leave them in the comment below!
We will feature your points on this list here!
Q 1. How do I reset my Zmodo doorbell?
A 1: You can reset the Zmodo doorbell by pressing and holding the reset pin on the bottom of the doorbell until the status LED is off.
Please wait until the doorbell gets power back and try to configure the doorbell again once the status LED flashes green.
Q 2. Why won’t my Zmodo doorbell connect to WiFi?
Zmodo doorbell is offline, how can I reconnect it?
A 2: Please try the below solutions to fix the WiFi connection failure issue.
Solution 1. Please confirm if you have entered the correct password for your WiFi, and reset your doorbell camera and retry the setup steps.
Solution 2. Make sure your WiFi band is 2.4 GHz instead of the 5 GHz band, since the Zmodo video doorbell only supports 2.4 GHz WiFi band.
Solution 3. Your WiFi signal would be too weak for the Zmodo doorbell to pick up. You can relocate your router close to the doorbell camera, or get a WiFi repeater or booster and install it close to the doorbell.