How to Reset Geeni/Merkury Doorbell?
If you want to give your Geeni/Merkury doorbell away or want to resell it to someone else, don’t forget to delete the existing data and factory reset the doorbell. Besides, resetting the doorbell is an effective solution when you run into some technical issues including connection problems and device glitches.
How to Reset Geeni/Merkury Doorbell for Troubleshooting
To reset the button, you need to remove the installed Geeni/Merkury doorbell from the bracket first. If your doorbell is already taken off the wall or door, you can jump to step 3.
Tools You Need (They’re all included in the box):
- Security Screwdriver
- Reset Pin (or Your Phone Sim Pin)
Step 1. Remove the Security Screw

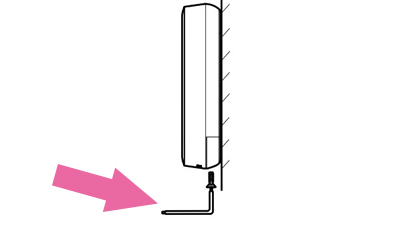
The security screw is on the bottom of the doorbell, and it is used to fix the doorbell and the bracket. Undo the security screw with the included security tool(screwdriver).
Step 2. Remove the Doorbell from its Bracket
After you take off the security screw, you can remove the doorbell from the bracket by pushing the doorbell up, and it will easily come off. You don’t need to remove the wires from the doorbell, but I recommend you cut your power first to ensure safety.
Step 3. Find the Reset Button
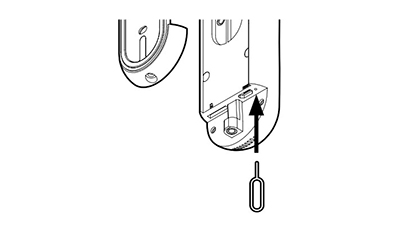
The reset button is a tiny hole that locates at the bottom of the doorbell, and it’s right next to the Micro USB slot.
Step 4. Reset the Doorbell with the Reset Pin

Insert the reset pin into the reset slot and hold it for five seconds. When the doorbell has a flashing red ring, the reset process is finished.
Step 5. Test if the Doorbell Is Reset Successfully
Now you can test the doorbell and see if the doorbell is disconnected from your WiFi. For troubleshooting, you can check out if the problem is fixed by connecting to the Internet again.
Step 6. Reinstall the Doorbell
Put the doorbell back to the mounting bracket and install the security screw again, and the doorbell is fully reset.


